Jan
Illuminate Your New Year’s Eve: Southern California Garden Party Edition
As the mild Southern California evenings grace us with their presence, take the opportunity to bid farewell to 2023 in style. Transform your outdoor space into the ultimate New Year’s Eve garden party with a few simple nighttime decorating tricks. From creative lighting to reimagined Christmas decorations, here’s how to craft the perfect atmosphere for a night of socializing, hors oeuvres and cocktails, and dancing under the stars.
- Set the Stage for Comfort: Before diving into the decorations, ensure your guests have a cozy outdoor space by incorporating heating elements like portable fire pits and heat lamps. Opt for lush, cold-activated superior fescue sod to delineate your party area and walkways, providing a resilient foundation for your festivities.
- Hanging Decor Magic: Utilize the vertical spaces in your backyard for festive decorations. Hang star garlands, streamers, curled ribbons, and glittery Christmas bulbs from tree branches, decks, outdoor staircases, or even your backyard tool shed. Embrace the charm of irregular placement to weave together the existing elements of your outdoor haven.
- Elegance in Floral Pots: Add an air of sophistication with cut flowers in decorative pots that match your chosen color theme. White roses in glass bowls with gold foil accents exude classic elegance. Scatter these floral arrangements at the edges of your party space or make them the centerpiece of guest tables for an extra touch of charm.
- Reimagined Christmas Decor: Give your Christmas decorations a second life in the backyard. Revitalize a Christmas tree with metallic tinsel, glittery ornaments, and luminous garlands. Illuminate tree trunks, arches, and awning poles with Christmas lights or create a magical ambiance with string lights and paper lanterns. Transform a Christmas wreath with quirky elements like pinwheels for a playful touch.
- Creative Outdoor Lighting: Soft lighting is key to maintaining a festive and relaxed atmosphere. Reuse Christmas lights and explore other inventive options. Hang candles in mason jars from tree branches, use votives to outline walkways, or employ tiki torches to corral your guests and create a warm glow that lasts well into the night.
- Enchanting Archway Designs: Welcome your guests with festive archways that set the tone for celebration. Cover them in balloons matching your color theme, string lights, or drape long “hair” tinsel to add an element of mystique. Make your guests feel like VIPs as they step into your transformed garden party space.
With these imaginative decorating ideas, your New Year’s Eve garden party is guaranteed to be a memorable affair. Embrace the enchanting ambiance of a beautifully adorned outdoor space and usher in the new year surrounded by the warmth and beauty of your transformed garden. Cheers to a night of celebration, under the stars and in good company! For more information visit: http://westcoastturf.com
Happy New Year!
Comments Off on Illuminate Your New Year’s Eve: Southern California Garden Party Edition
Dec
Synthetic Turf – Drought Fix or Health and Environmental Hazard?
California is no stranger to drought, it’s a recurring feature of our climate, especially in desert areas. Arizona has been in some stage of drought since 1994(!), so drought is a long-term concept in the West. Many shifts are made for the purpose of water conservation, one of which is in landscaping. With these dry times saw a large uptick in fake lawns.
In a recent controversial move, California Governor Gavin Newsom vetoed a bill aimed at restricting the use of “forever chemicals” in synthetic lawns. The veto highlights the state’s complex stance on artificial turf, as it was a material once promoted as a water-saving solution during droughts. The vetoed bill was part of a broader effort to address health concerns associated with synthetic turf, particularly the presence of perfluoroalkyl and polyfluoroalkyl substances (PFAS). These chemicals, found in the crumb rubber base of artificial turf, have been linked to various chronic diseases. Despite growing worries about the environmental impact and health risks, manufacturers claim they are working to address concerns by exploring alternative materials. However, removing PFAS entirely has proven challenging.
The debate over synthetic turf in California reflects a shift in legislative priorities, with some cities already moving to ban artificial lawns due to environmental concerns. Researchers emphasize the potential health risks associated with PFAS, which can enter the human body through various pathways, including skin contact, inhalation, and water contamination.
Studies indicate that high temperatures can cause chemicals to leach out of the crumb rubber base, posing additional risks to human health. Synthetic turf, known for its heat-retaining properties, can reach temperatures significantly higher than living grass, making it a cause for concern. Experts suggest that real grass and plants offer a more sustainable and environmentally friendly alternative to synthetic grass. Drought-friendly landscaping options, such as warm-season grasses and native plants, provide cooling benefits and contribute to a healthier urban ecosystem.
Comments Off on Synthetic Turf – Drought Fix or Health and Environmental Hazard?Jun
Dos and Don’ts of Home Sod Installation
When installing California and Arizona sod for your home, there are several dos and don’ts to keep in mind to ensure successful establishment and healthy growth. Here are some guidelines to follow:
Do:
- Prepare the soil: Ensure that the soil is properly prepared before laying the sod. Remove any existing grass, weeds, rocks, or debris and loosen the soil with a rake or tiller. Level the surface to avoid uneven areas.
- Test soil pH: Conduct a soil test to determine the pH level and nutrient content of the soil. Adjust the pH as necessary by adding lime or sulfur to create an optimal growing environment for the sod.
- Water the soil: Before installing the sod, water the soil thoroughly to provide adequate moisture for the roots. This helps the sod to establish and promotes good root contact with the soil.
- Lay the sod promptly: Install the sod as soon as possible after delivery or purchase. Sod is a perishable product, and delaying the installation can lead to drying out or root damage.
- Lay the sod properly: Start laying the sod along a straight edge, such as a sidewalk or driveway, and work your way across the lawn. Butt the edges of each piece tightly against each other without overlapping, ensuring no gaps or spaces are left between the pieces.
- Water immediately: Once a section of sod is laid, water it immediately. This helps settle the soil, removes air pockets, and promotes contact between the roots and soil.
- Water regularly: Keep the sod moist by watering it regularly for the first few weeks after installation. Aim for deep watering to encourage the roots to grow deeper into the soil. Avoid overwatering, which can lead to shallow root growth and other issues.
- Mow with care: Once the sod has established and grown to the recommended height, mow it to maintain its appearance. Set the mower at the appropriate height and avoid cutting more than one-third of the grass blade length at a time.
Don’t:
- Don’t delay installation: As mentioned earlier, avoid delaying the installation of the sod. The longer it remains rolled up, the greater the chances of it drying out and deteriorating.
- Don’t stretch the sod: Avoid stretching the sod while laying it. This can cause the roots to separate from the soil, making it difficult for them to establish properly.
- Don’t leave gaps or overlaps: Ensure that the sod pieces are laid tightly against each other without gaps or overlaps. Leaving gaps can result in weed growth and uneven appearance, while overlaps can lead to uneven rooting and hinder growth.
- Don’t overwater or underwater: Striking the right balance with watering is crucial. Overwatering can suffocate the roots, encourage disease, and lead to shallow root growth. On the other hand, underwatering can cause the sod to dry out and wither.
- Don’t walk on the sod too soon: Avoid walking on or putting heavy objects on the newly installed sod for the first few weeks. This gives the roots time to establish and prevents damage to the delicate young turf.
- Don’t mow too short: When it’s time to mow, avoid cutting the grass too short. Scalping the lawn stresses the grass and weakens its ability to thrive.
- Don’t neglect maintenance: Once the sod is established, continue with regular maintenance practices such as watering, fertilizing, and weed control. Neglecting these aspects can lead to the deterioration of your lawn.
Remember, each sod variety may have specific care instructions, so it’s always beneficial to consult with a local expert or refer to the sod supplier’s recommendations for best results.
Comments Off on Dos and Don’ts of Home Sod InstallationJul
Sod: Not Just for Your Lawn
We often talk about sod on a large scale, from athletic fields and golf courses to housing developments and private homes. But our sod has many more uses, as you’ll see.
Events
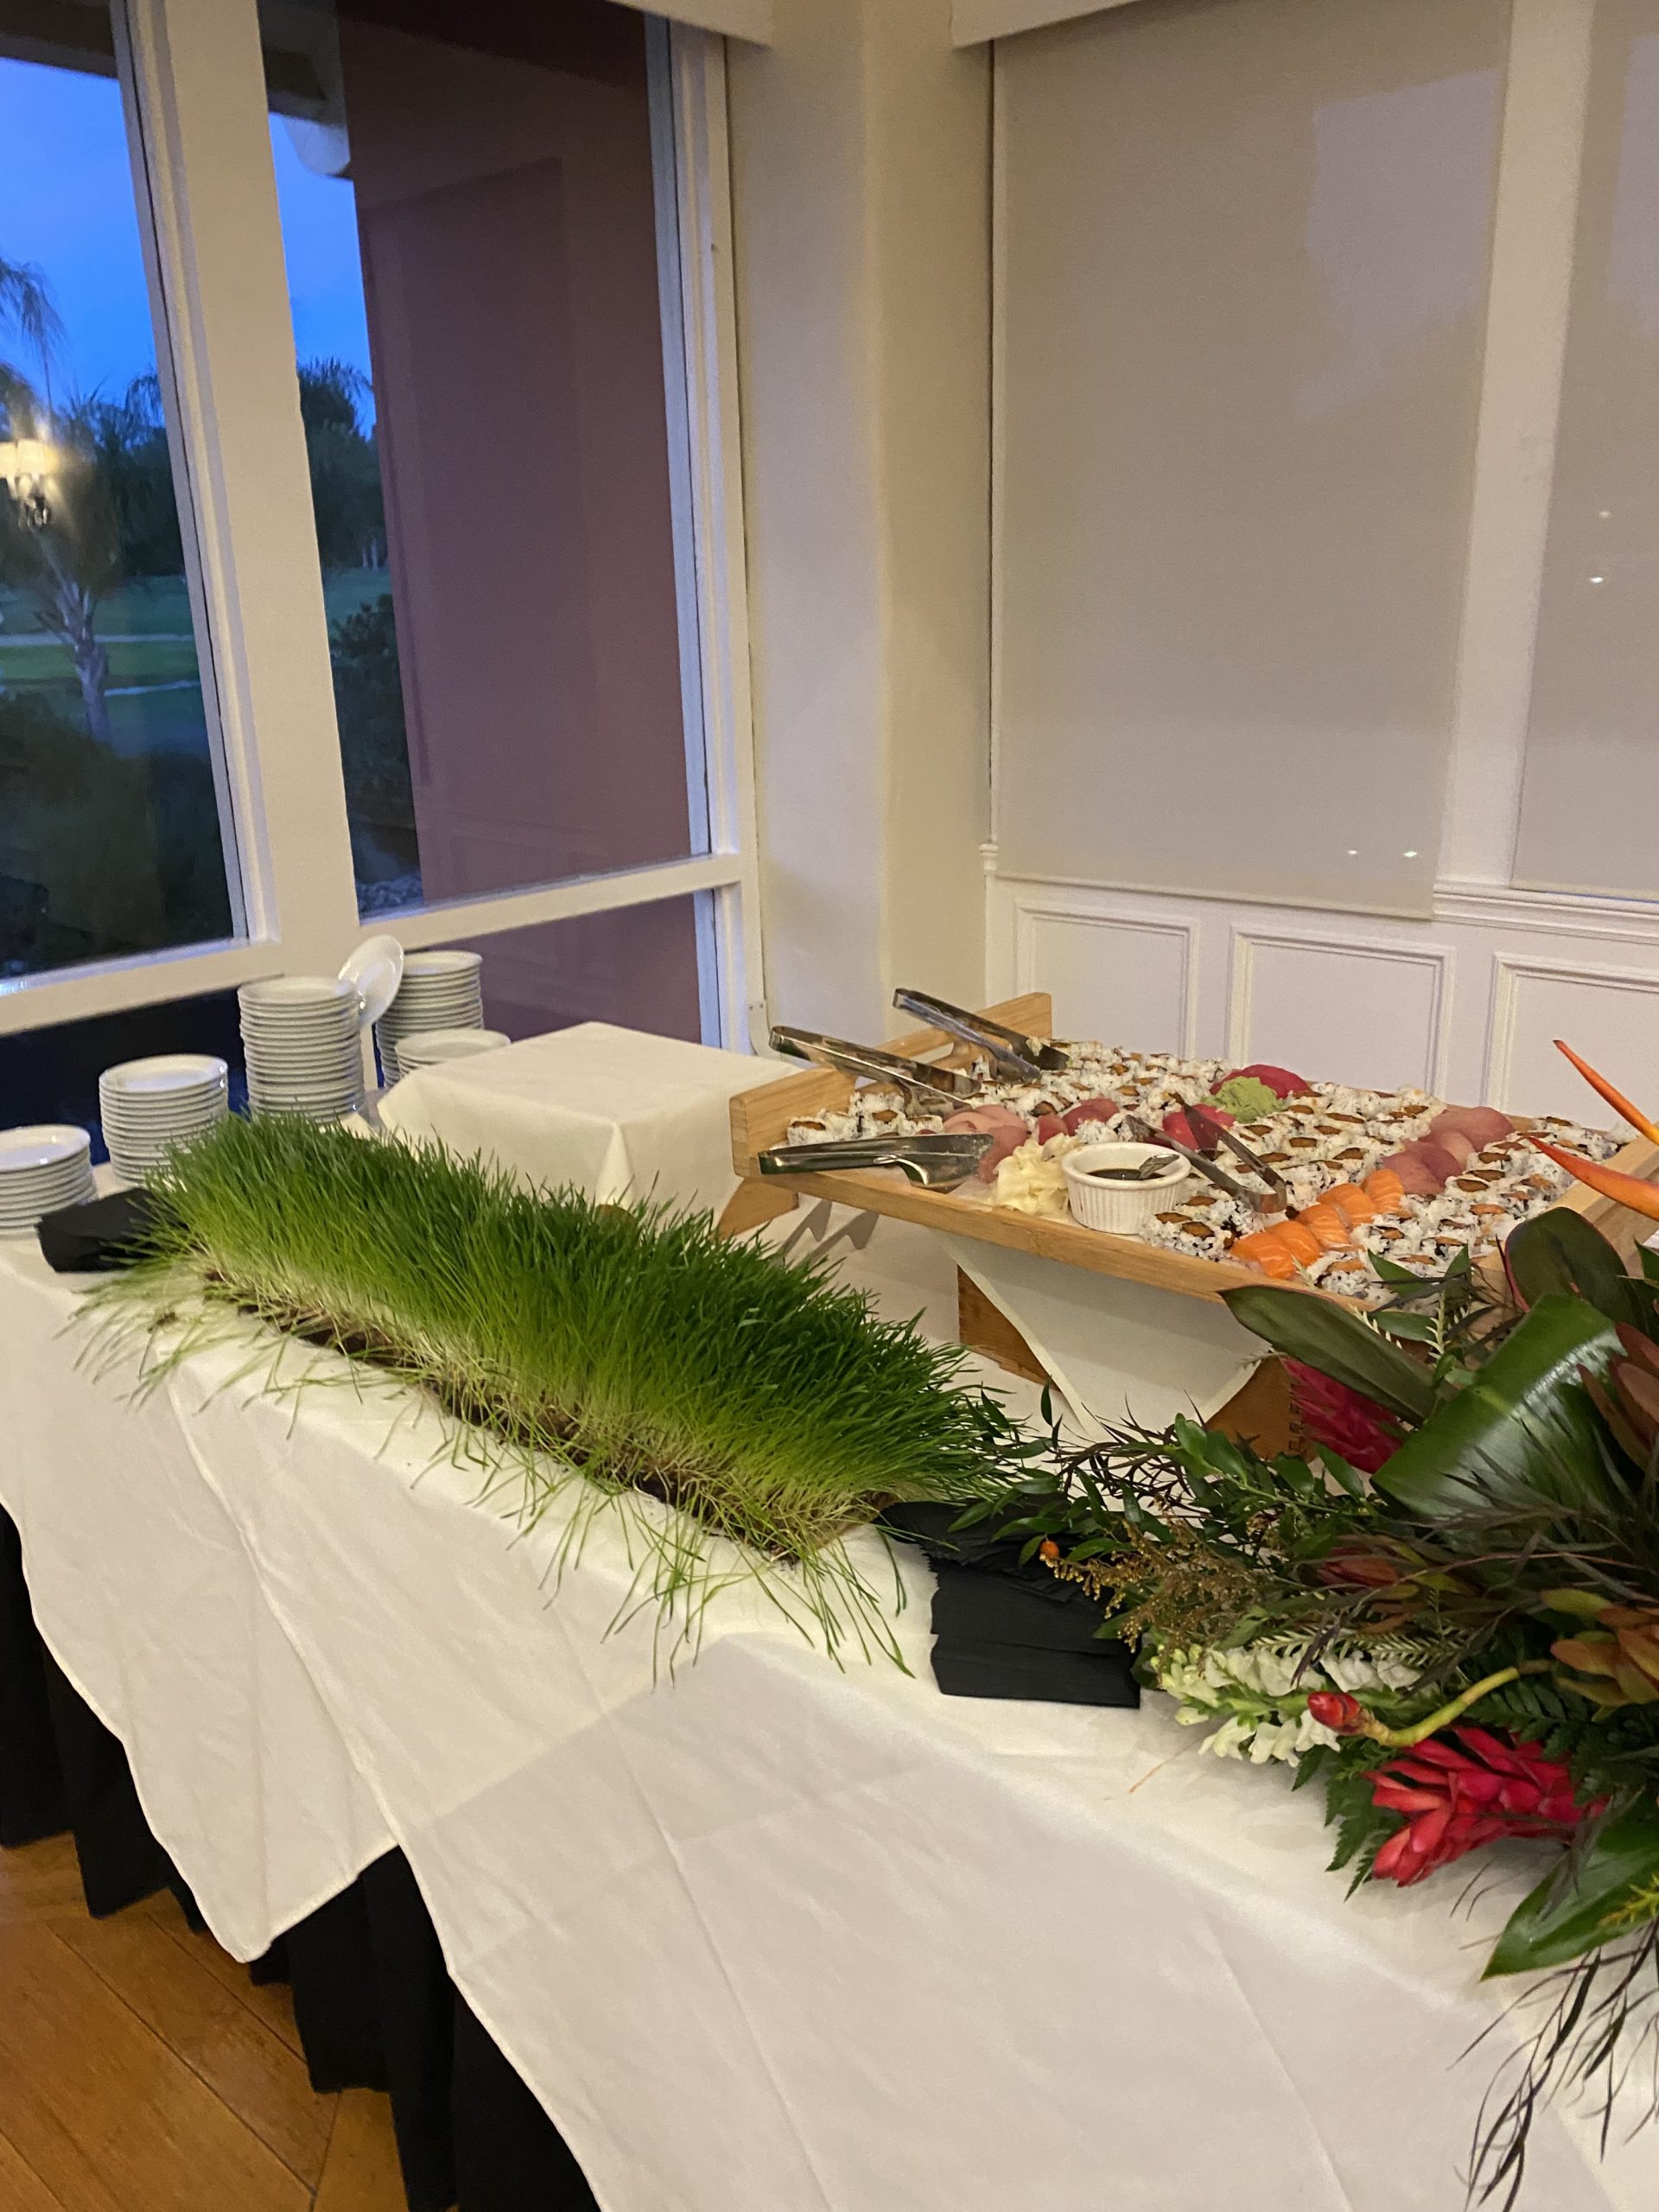 One place sod can be very useful is at events. You can lay down temporary sod for an outdoor area you’d like to soften up and give a more natural look. It looks great as decorative pieces, as well. We recently served a wedding where sod was used as a tabletop, as well as side accents.
Compost
One popular and helpful way to use sod is by creating a sod composting pile. When you take out sod to create a hard path or walkway, you will have extra and wonder how to dispose of it. The answer is not to dispose of it at all, put it to use! While the sod is still fresh, find a corner of your yard and lay down a piece of sod grass. Stack face down pieces of sod on top of that, wetting each piece before adding another. Once your composting sod pile is as high as you’d like it to be (not to exceed 6 ft), cover the it in thick black plastic. Weigh the edges down against the ground with stones or cinder blocks, making sure not to let any light to get in. Let your composting sod pile sit until the following spring and uncover it. Inside, you will find rich compost ready for use!
Gardening
Another great use for sod is creating the base for a garden or flower bed. Follow these steps to starting your new garden base! Pile the sod, grass down, in your new garden space until it reaches the desired height. Then cover it with 2–3 inches of topsoil. Finally, add 3–4 inches of mulch. This is a great way to use old sod to increase garden height for better drainage, or even build a tall, raised bed if desired. The sod slowly decomposes into rich soil which will eventually feed the plants in your garden.
Those are just a few small-scale uses of sod. Talk to us about your sod projects – large and small – and see what we can do for you! For more information, visit our website westcoastturf.com
Comments Off on Sod: Not Just for Your LawnApr
Spring Cleaning Your Outdoor Space
The sun’s out, but it’s not too hot yet – now is the perfect time to get your home, garden, and outdoor spaces ready for spring. Here are some simple steps to getting the spring cleaning done.
- Clean, clean, clean. Wash windows and floorboards, dust off any cobwebs, sweep surfaces, and clear away any debris from fallen leaves and trees. Power wash your patio or deck. Wipe down patio furniture. Clean or replace any outdoor furniture as needed.
- Update your green spaces. Mow your grass, trim your shrubs, redefine garden beds, make sure your natural grass is healthy and in a good routine for watering and mowing. Have fun with it – add pops of color in planters and herbs to your garden for cooking.
- Aerate your lawn, if necessary. If your lawn gets heavy traffic, such as lots of running and playing in the same spot, this can cause soil compaction. A lawn aerator creates openings in lawn turf that allows water and air to penetrate the soil and reach the grassroots. You can rent a lawn aerator at a big box hardware store, or, if you have a small lawn, use a hand aerator to do it. If you must aerate in the spring, consider doing it around Memorial Day, after weeds have started growing but before they go to seed.
- Weed your lawn. If you prefer weed-free lawns, spring lawn care is as much about weed prevention as it is about fostering healthy lawn growth. Depending upon whether a weed is annual or perennial, you will use either a pre-emergent herbicide or a post-emergent herbicide.
- Service your lawn mower. Spring means it’s time to get out the lawn mower and make sure it’s in working order. Start it up – stubborn start-ups are a sign that it might be due for a tune-up (mowers should be given tune-ups once a year). If your lawnmower needs more than a tune-up, then consider getting a new one. Among the key tune-up tasks is sharpening the mower blade. A regular sharpening will ensure the blade severs, rather than tears, the grass, leading to a nice green lawn rather than one with ragged brown tips.
Once your outdoor space is ready, get outside and enjoy this beautiful spring weather! For more information visit https://www.westcoastturf.com
Comments Off on Spring Cleaning Your Outdoor SpaceNov
You Have Overseeded Your California or Arizona Sod Lawn–Now What? And….Even if You Haven’t.
By now, most of you who are going to overseed your California or Arizona sod have either begun the process or have had your seed down for a few weeks. Today, I want to discuss what to do now that you have the ryegrass growing and cooler temperatures are on the horizon.
Getting your ryegrass up and growing is obviously the first step to a successful winter lawn, but what about maintenance? How can you make sure your ryegrass is strong going into the winter and you will have a full stand of ryegrass once the temperatures begin to drop into the 40’s at night? There are several key items associated with a strong winter lawn but early preparation should be high on your list.
I know you put down a starter fertilizer with your seed but let’s remember that fertilizer will move freely in a saturated soil. The new plant took up most of the nutrients from the starter fertilizer application but the residual affect is limited because you’ve been keeping the seed wet for the past few weeks. So what exactly does this mean? Basically, what I’m trying to say is that once you’ve had your ryegrass lawn in for 2-3 weeks I would advise getting a second fertilizer application on the grass.

Oct
Frequently Asked Questions About Overseeding Your Warm Season Lawn
Now that we’re into October it’s time to get the overseeding of your warm season grass process started. I wanted to pass along some of the most frequently asked questions during this time of the year.
When is the best time to start overseeding?
Ideally overseeding should be done when nighttime temperatures are consistently in the 60’s. Usually this will be in October. There will be some higher and lower than normal temperatures, but anytime during October is good.
How low do I need to scalp the grass prior to seeding?
Height of cut isn’t as important as opening the turf canopy. The shorter you mow the grass, the tighter the turf canopy will be which will result in the need to verticut more aggressively. I recommend not going lower than ½”. There is no need to take the lawn to the dirt or you will cause long term problems to the grass plant.
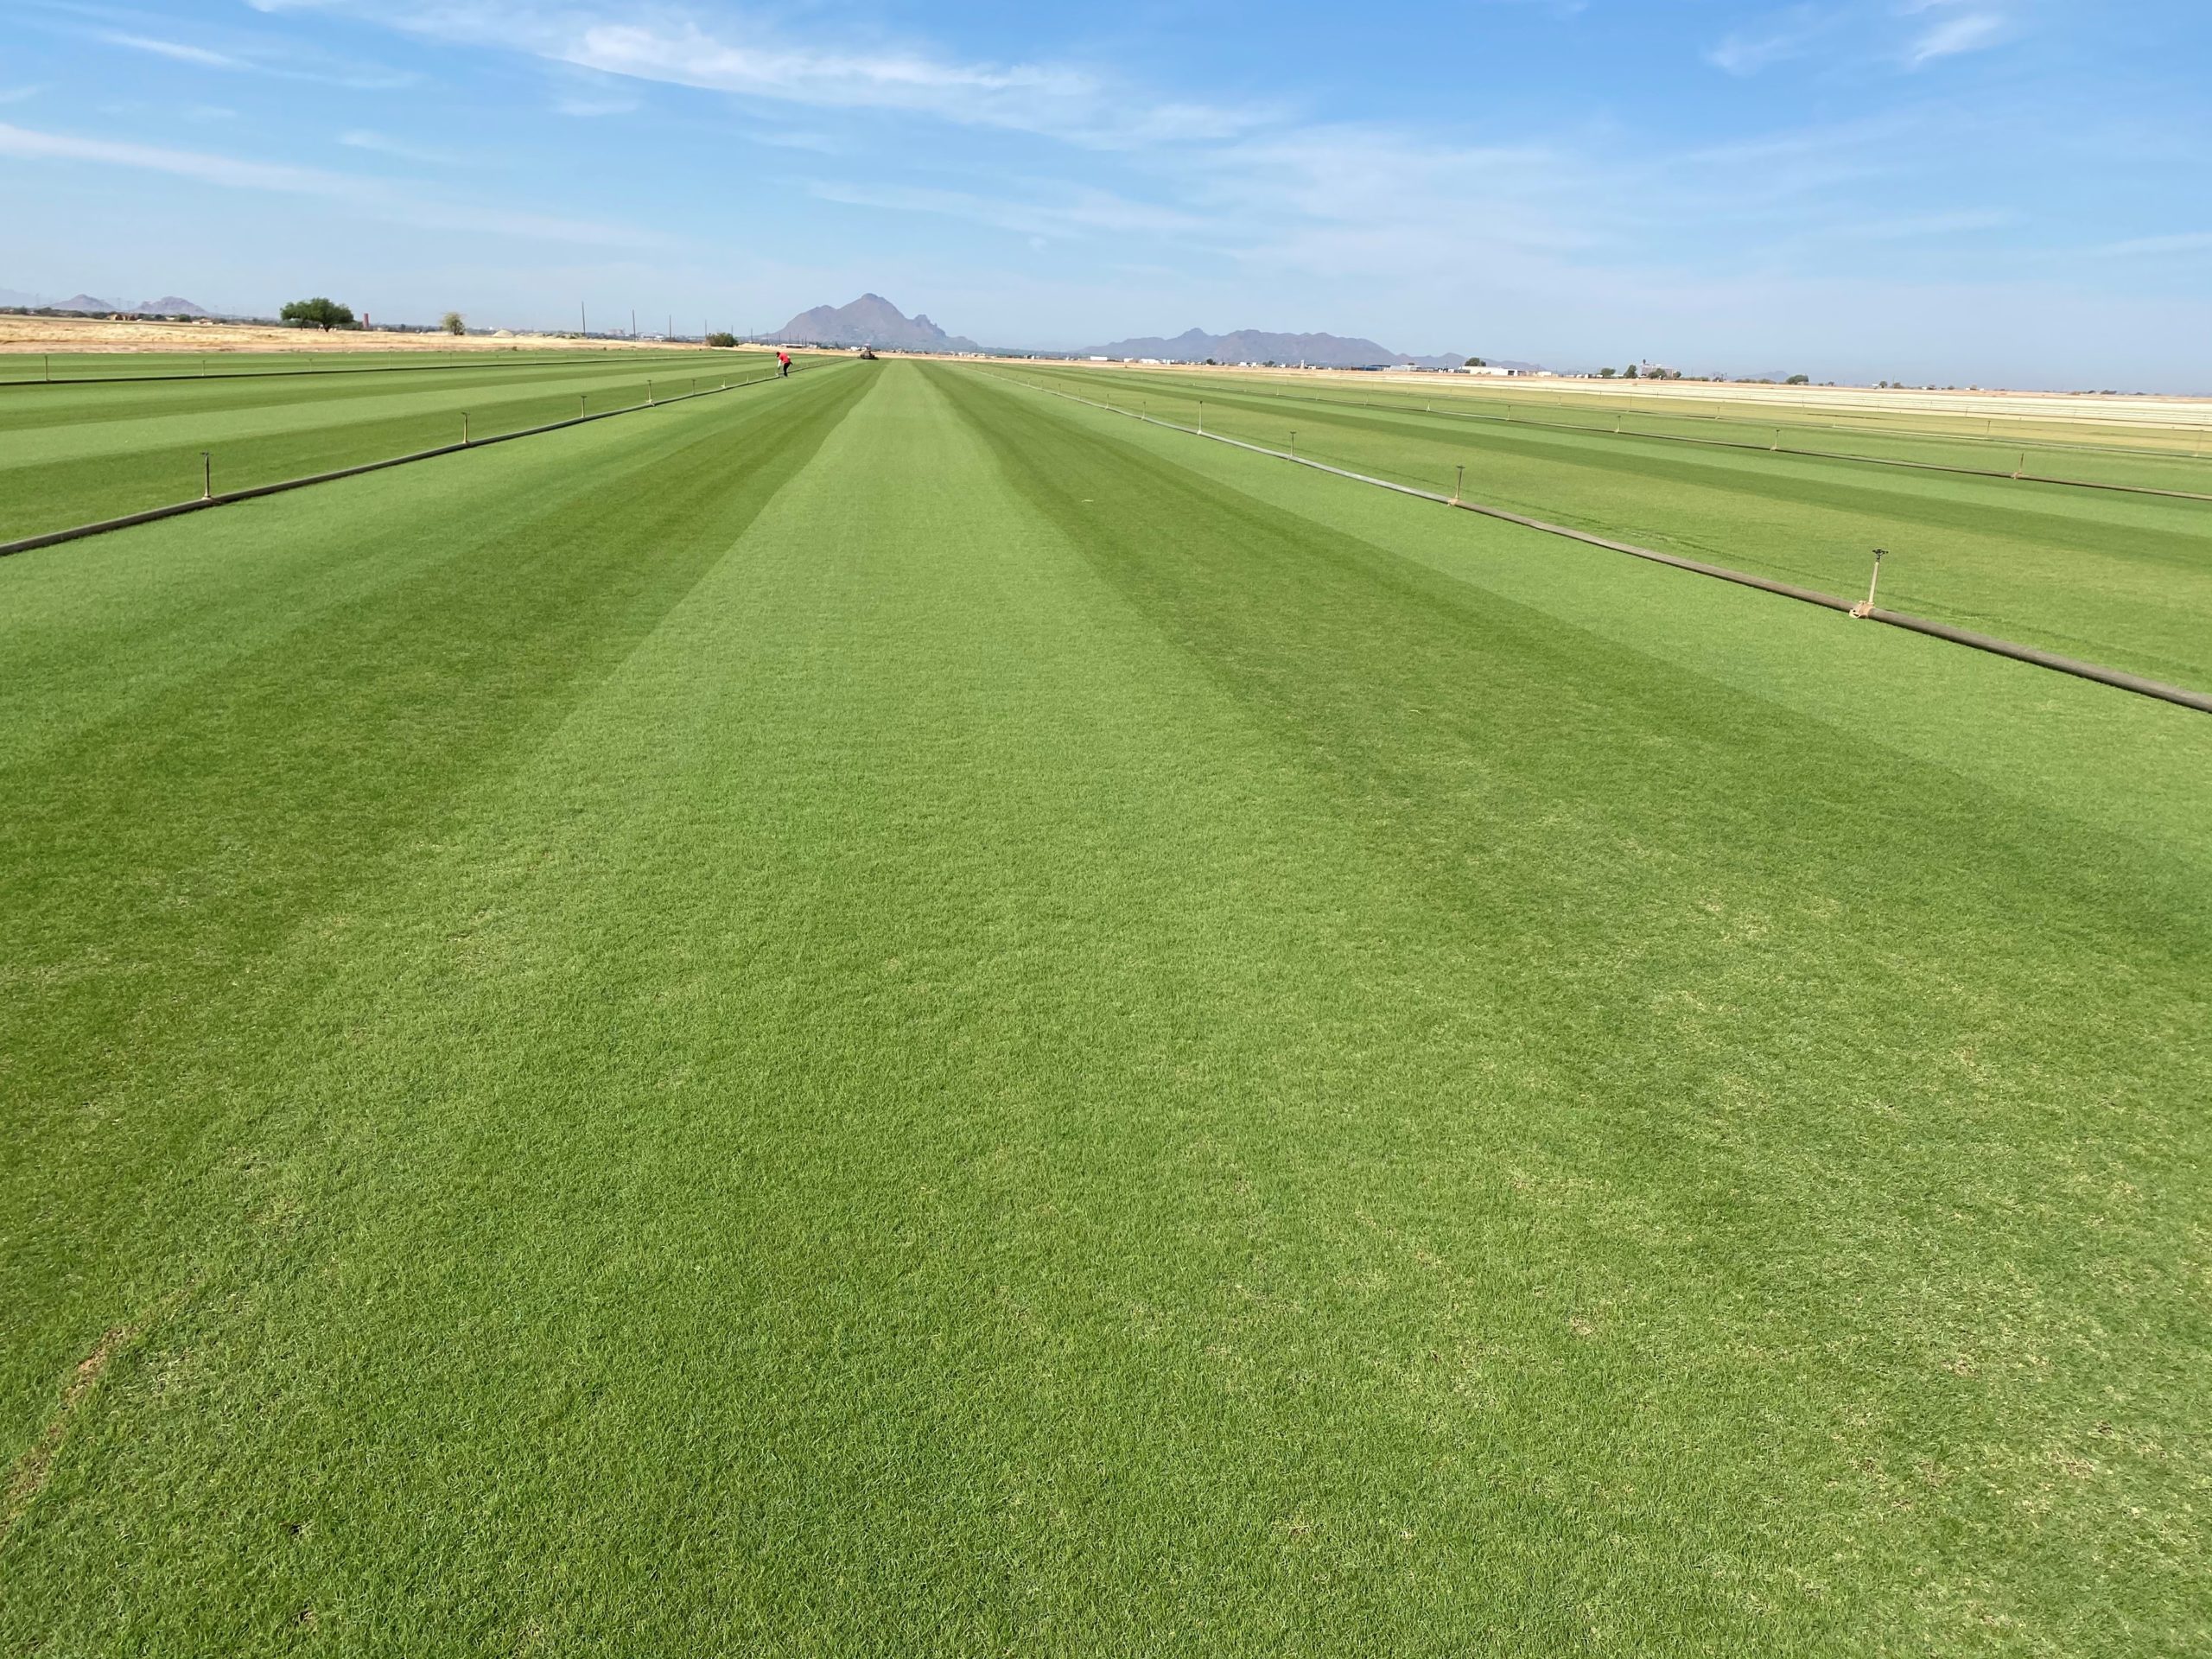
This overseeded bermuda sod field in Scottsdale, Arizona, is READY!
Sep
Invierno, siembre su césped de Arizona
A medida que nos acercamos al final del verano, los equipos de cuidado del césped se están preparando para una siembra excesiva y para mantener la hierba verde durante el invierno.
Primero, analicemos la preparación inicial del césped. Deje que su césped crezca un 25-30% de altura para proporcionar más densidad de hojas. Otra ventaja de mantener su césped a una altura más alta es que usará menos agua, y cuando le corte el cuero cabelludo le dejará muchas hojas nuevas y saludables para la primavera. Si tiene un césped saludable, es bueno pasarle el rastrillo ligeramente o cortarlo verticalmente en ese momento. Esto abre el dosel del césped y permite que las semillas lleguen al suelo. Si normalmente mantiene su césped a 1 “, podrá elevar la altura de su césped durante las próximas dos semanas a alrededor de 1.25″. Cuando el clima coopere, puede cortar el césped ligeramente por debajo de su altura de corte normal. La mayoría de los cortacéspedes rotativos se pueden bajar a ¾ ”.(Tres cuartos).
Recuerde que no todas las semillas son iguales. Aquí hay algunos consejos a tener en cuenta al mirar una bolsa de semillas.
1. El mejor material para la siembra de invierno es el ryegrass perenne (Hierba de centeno perenne). Si bien parece que la “Anual de hierba de centeno tiene sentido”(Anual ryegrass), este no tiene el vigor, el color o la densidad que tiene la hierba de centeno perenne.
2. Tasa de germinación: la tasa de germinación le indicará qué cantidad de semilla es viable. Si recoge una bolsa con una tasa de germinación del 60%, entonces necesita un 40% más de semillas para dejar la tasa correcta. Tiene que encontrar una bolsa con más del 85% de germinación.
3. Semilla de malezas: este número debe ser cero. Cualquier semilla de
marihuana o materia inerte causará estragos en su césped sobre el sembrado.
4. Muchas veces las semillas de ryegrass (hierba de centeno) mezcladas son más baratas porque ponen diferentes grados de semillas en la bolsa. Algunas mezclas son semillas muy buenas y proporcionan diferentes protecciones para las plantas, pero algunas se mezclan con semillas de menor grado. Recuerde que la semilla de ryegrass (hierba de centeno) tiene un precio por germinación, semilla de malezas y calidad de la semilla. Por lo tanto, si ha encontrado un acuerdo sobre semillas, no siempre será su mejor apuesta.
Materiales para Siembra excesiva.
Semilla de ryegrass perenne (Hierba de centeno perenne) de alta calidad.
Fertilizante inicial: cuando recoja su semilla, también recoja un fertilizante inicial. Algunos buenos son Soil Burst 4-4-2, 11-52-0 o 6-20-20.
Segunda aplicación de fertilizante: se puede aplicar después de cortar el césped por primera vez. Los fertilizantes a considerar son 21-7-14, 11-52-0 o 6-20-20.
Todos sus rociadores deben estar funcionando y ajustados adecuadamente. Revise todas las boquillas después del cuero cabelludo en busca de astillas o abolladuras que el cortacésped pueda haber causado al cortar más.
Rastrillo eléctrico o verticutter.
Instrucciones para Siembra excesiva.
1. Reduzca el agua un 25% dos semanas antes de la siembra excesiva. Detenga todas las aplicaciones de fertilizantes cuatro semanas antes de la siembra.
2. Eleve la altura de su césped 25-30%. Usted hace esto para que corte el césped desde el cuero cabelludo y no lo esté cortando desde la tierra, sino que esté cortando el césped a una altura manejable, lo que no causará ninguna lesión al césped en la primavera.
3. Rastrillo eléctrico o verticut el césped. No configure la máquina para desenterrar nuevos rizomas del suelo. Su objetivo es abrir el dosel de césped.
4. Después de encender el rastrillo, corte los recortes. El cortacésped funciona muy bien para recoger el césped. A continuación, configure el rastrillo eléctrico en una configuración más baja y realice el mismo proceso en una dirección diferente. Esto abrirá el dosel de césped denso y permitirá que la semilla ingrese a la planta de la hierba.
5. Corte los recortes nuevamente. Después de que se hayan limpiado los recortes, ajuste su podadora a ¾ ” (tres cuartos) o ½” (un medio) si tiene una cortadora de carrete y corte el césped. La única razón por la que está descalcificando es para evitar que el césped de la temporada cálida compita con la semilla de ryegrass (hierba de Centeno).
6. Tan pronto como limpie el césped, aplique su fertilizante de arranque. Estás buscando una aplicación de fósforo para ayudar a la semilla. Algunos excelentes fertilizantes son 4-4-2, 6-20-20 o 11-52-0 para comenzar con su césped.
7. Me gusta mantener mis rocas y bordes limpios, así que uso un separador de gotas. Primero aplique ryegrass perenne (hierba de Centeno perenne) a 10 libras por 1000 SF alrededor del perímetro del césped. Haga dos pases para asegurarse de que el esparcidor giratorio no arroje semillas a las rocas. Esto no es necesario, pero evitará que el ryegrass (la hierba de Centeno) invada áreas indeseables durante todo el invierno.
8. Luego aplique su hierba de centeno perenne con un esparcidor giratorio a 10-12 libras por 1000 SF al resto del césped. Si desea la mejor cobertura, debe aplicar 5-6 libras de semilla por 1000 SF en dos direcciones. Este es siempre el mejor enfoque, pero nuevamente no es necesario.
9. Tendrá algo de semilla encima de la superficie del césped, pero la mayoría debería estar dentro de la planta de césped si preparó su césped correctamente y abrió el dosel. Puede usar una escoba para ayudar a que cualquier semilla adicional ingrese a la planta.
10. Siga las instrucciones de riego a continuación.
Algunas personas cubren sus semillas con mantillo, pero puede ahorrar su tiempo, dinero y el olor en su jardín porque esto no es necesario. El mantillo permite que la semilla mantenga la humedad y mantiene el calor en la planta, pero si siembras en septiembre / octubre, hace mucho calor. No necesita preocuparse por la humedad tampoco. El mantillo no evita que las aves coman su semilla e incluso si ellas comen algo de semillas, usted ya ha aplicado muchas semillas con la tasa de 10-12 libras / 1000 SF.
Regar tu césped cubierto.
Semana 1-2: Riegue 3 veces al día durante 5-7 minutos por ciclo. Asegúrate de no tener estanques. Si lo hace, baje la cantidad de agua. Sugiero regar alrededor de las 8 a.m., mediodía y 4 p.m.
Semana 3: Riegue 2 veces al día durante 12-15 minutos. Dado que la planta es muy nueva en este momento, lo mejor es una aplicación por la mañana y por la tarde. Por lo general, puede cortar el césped por primera vez después de 14 días. Es mejor dejar que la hierba se seque durante varias horas antes de hacer el primer corte. Mantenga el cortacésped a una altura superior a la normal.
Semana 4: agua 1 vez por día durante 10-15 minutos. Durante este período de tiempo, puede cortarlo cada 5-7 días.
Semana 5: Riegue cada dos días 10-15 minutos. Corte el césped cada 5-7 días según sea necesario y aplique una vez más Soil Burst 4-4-2, 21-7-14 o 15-15-15.
Semana 6 y más allá: Riegue cada 2-3 días según sea necesario hasta que las temperaturas se enfríen durante el invierno. Durante el invierno, puede estirar su ryegrass (Hierba de Centeno) aún más entre riegos. Sugeriría aplicaciones de fertilizantes cada 28 días durante el otoño. Cuando las temperaturas caen alrededor del punto de congelación, es mejor usar fertilizantes líquidos para mantener el vigor del césped.
Jay Danek
Mr. Wise Grass
11803 E. McDonald Drive
Scottsdale, AZ 85256
480-951-8700
www.westcoastturf.com
Sep
Winter Overseeding Your California and Arizona Sod Lawn
We often see overseeding your warm season California or Arizona sod lawn as a process that should be done in a weekend. For some this may be the most convenient way to prep but for others its okay to take a week or two to complete the process. Trying to knock it all out in one weekend can result in some really long days out in the heat. My suggestion is to slowly start the process now so in a couple weeks when the overseed window opens you’re ready to go and won’t be wasting your entire Saturday on the lawn. Remember that the ideal window is when nighttime temperatures are in the 60’s. We’re currently sitting in the high 70’s so I would expect a couple more weeks. To follow overseed instructions scroll to bottom of this blog.
Prepping for overseed is often a large ordeal, but starting the process gradually can eliminate a lot of headaches. I want to reiterate something I have said for the past few years. The height of the grass is not associated with a quality overseed. In other words, scalping the grass down to the dirt does not guarantee good results, but opening up the turf canopy does. The shorter you mow your lawn the tighter the leaf blades become making it harder to get the ryegrass seed into the plant. If the seed is lying on the surface it will be slow to germinate and much of the seed will be lost. The seed needs a base to grow out of, and getting inside the grass plant allows for perfect moisture, heat, and a solid growing medium. This is why it’s so important to have a good warm season grass base. If you have a new lawn or a weak summer lawn it can have a direct impact on your overseed. The seed will establish much faster inside a healthy grass stand than it will on bare dirt.
Comments Off on Winter Overseeding Your California and Arizona Sod Lawn
Sep
Pre-Overseeding Tips for Your Lawn
I would like to start by congratulating everyone on making through another California and Arizona summer. I know we still have a couple months of triple digit temperatures, but the worst should be behind us at this point. As we move into September our morning temperatures will start to feel less painful, but remember your warm season grass is loving this weather–especially your California and Arizona sod. I have started to field questions regarding fall overseeding and I want to tell you to hit the brakes. Don’t just tap the brakes, slam on the brakes. You will see ryegrass hit the stores in the next week but walk away or buy it and sit on it until temperatures really drop. Today I want to discuss prep for the fall, and how to get your grass ready to overseed. This won’t be a tutorial on how to overseed, but instead some pointers of what to do before you overseed.