Nov
The Hidden Dangers of Artificial Turf on your California and Arizona Lawn
While the desert temperatures finally start to cool down we will all be enjoying more time outdoors and enjoying the desert lifestyle to the fullest. Golf courses are reopening and luckily the majority are natural grass. But use caution when on artificial turf as there are several hidden dangers you may be unaware of.
1. It can be dangerous to pets and children:
When pet waste is left unattended, it becomes a breeding ground for harmful bacteria and pathogens. These invisible dangers can lead to various health issues, especially if you have little ones and pets who love spending time outdoors and or have compromised health conditions such as asthma, COPD, cancers, and a vulnerable immune system.
2.Chemical exposure:
Chemicals known to be carcinogenic such as heavy metals, volatile organic compounds like benzene, polycyclic aromatic hydrocarbons, and harmful butadiene have been detected in turf infill made from recycled tires. “Eco-friendly” artificial turf is not a certifiable claim.
3. Heat:
This concern is paramount in the Coachella Valley and surrounding Southern California areas, where temperatures hit 124 degrees this summer. Artificial surface temperatures can get up to 60 degrees higher than natural grass (and have even been measured as high as 200 degrees Fahrenheit on a summer day!) The air at your head height also measures much hotter than the air directly above natural grass surfaces like West Coast Turf. This increases the risk of skin burns and heat illness, not to mention burning the paws of your beloved pets as well.
These are just a few of the reasons that a synthetic artificial turf surface can be harmful to you, your loved ones, your children or grandkids, and even your pets. Please contact us today for your safest option: natural turf from West Coast Turf.
For more information, visit: https://www.westcoastturf.com/
Comments Off on The Hidden Dangers of Artificial Turf on your California and Arizona LawnOct
It’s Fall Overseeding Time (for your California and Arizona Turf)
Overseeding is a rejuvenating process that can breathe new life into your grass. Fall is the perfect time for overseeding, since the soil is still warm from the summer months, and there’s usually a bit more moisture in the air. Overseeding helps fill in bare spots, improves turf density, and enhances the overall aesthetic appeal of your lawn.
Here’s a step by step guide to overseeding your grass in the fall.
1. Prepare your lawn. Start by measuring it – this is important for calculating how much seed and fertilizer you’ll need. Then mow your lawn shorter than usual for better seed-to-soil contact.
2. Choose the right seed. Select a high-quality grass seed blend that suits the dry desert climate. Consider factors like sun exposure, soil type, and foot traffic of the area when making your choice.
3. Seeding – Evenly distribute the seeds across the lawn, paying special attention to thin or bare areas, ensuring thorough coverage. Consider mixing seeds with a starter fertilizer to provide essential nutrients.
4. Watering – It’s important to keep the soil consistently moist to support seed germination, so water lightly but frequently, ensuring the soil doesn’t dry out. A light watering in the morning is ideal.
5. Maintenance – Germination can take several weeks. In this time, it’s best to avoid heavy foot traffic in the newly seeded areas. After that, resume mowing and watering as usual.
6. Fertilization – once grass has reached 2-3 inches, apply a balanced fertilizer to encourage healthy growth.
When to Overseed:
Overseed established bermuda and other warm season lawns from mid-October through mid-November. Temperatures should be less than 65 F at night on a consistent basis or less than 78-83 F during the day. It is not recommended to overseed a bermuda lawn until it has been established for at least 3 months, allowing rhizomes to fully mature.
Winter Lawn Varieties
Perennial ryegrass is the primary grass for overseeding bermuda lawns. Perennial is preferred over annual ryegrass because it is heartier and the blades are darker green, finer, and easier to mow. Annual ryegrass is more likely to stain clothing and walkways.
1. You will want to rent a verticut and set it at the 1/2 to ¾ depth. Take out the thatch and dead material until you are left with approximately ½” of thatch. If you have any more than this it harbors insects, impedes water and fertilizer penetration. If you have a huge thatch buildup you have probably had some watering issues this summer and that directly impacted your drought tolerance.
2. Next you will lower your mowing height one setting and scalp down the leaf tissue. You are not trying to scalp the grass down to the dirt because this will result in a poor stand of grass for next year. You want to save some of the energy of the plant so it can come back strong in the spring. You will drop the height one more setting so you are just below your mowing height from a week ago and get a second scalp on the lawn to clean it up. This often results in the closing of the turf canopy and a second vertical cut is often necessary to open the grass plant back up. Once you have made the second vertical cut, mow up all the clippings and blow off any excess material from the grass. You lawn should have an open canopy so the seed can fall down into the thatch layer.
3. After the lawn has been cleaned up and the yard is clear, it is time to add your starter fertilizer.
4. Get your perennial rye seed and have your spreader calibrated to drop 8-10 pounds of seed per 1000 SF. You will start with the perimeter of the lawn and drop the seed at a ½ rate two directions. I advise having someone follow you while you seed with some paint and mark out where the seed has fallen so you don’t overlap or miss an area. After the edges are complete you will then switch to your rotary spreader and seed the middle of the yard at ½ rate two directions. Again the total rate is 8-10 pounds per 1000 SF so you will be putting out 4-5 pounds at a time. This ensures the grass comes up in corn rows and you have not missed any areas.
5. Turn on your water for 3-4 cycles per day for 5-7 minutes. You are just trying to keep the seed moist throughout the day and free from drying out. This will be the irrigation cycle for the first two weeks until the grass has grown up to an inch. At this point you can gradually reduce some of the daily cycles and get it down to one long cycle early in the morning.
6. At the 10-14 day mark apply your second fertilizer. You should use a balanced fertilizer that will help keep the grass growing and the root system developing.
7. You may be able to mow your grass before the second fertilizer application but if not, you will do it a couple days after it has worked itself into the soil. This is a longer cut and you are just giving the grass a haircut. Ideally this cut will be made to the grass in the afternoon when it has had a chance to dry down a little.
8. At the 3-4 week mark apply your third fertilizer application. You want to do this before we receive our first frost which is generally right around Thanksgiving. This will both get your grass growing and allow the ryegrass to start to tiller and get healthy. If you wait till after the frost you will often lose color in your ryegrass and get yourself stuck behind the 8 ball.
9. You should be mowing 1-2 times per week after the lawn is established and gradually taking it to your desired mowing heights.
10. Most of you will have your lawn up and established a couple weeks before we receive a frost so it is always a good idea to get another fertilizer application down right before this happens, usually in mid November. Use a product that will sustain a good root system and also keep color once the frost hits. On our farm we switch over to Soil Burst 4-4-2 to get the grass winter hardy and maintain good color.
*** It is very important to use the right amount of seed. There are several companies that advertise that you can get 20,000 SF out of a 50 pound bag of seed. If you read the directions on the back of the bag it clearly states this is for the northern states. These labels can sometimes be confusing so be careful. Make sure you are buying a high quality perennial ryegrass seed with a minimum of 90 percent germination and zero weed seed.***
Video on how to scalp your lawn for overseeding.
Here is a video presentation with MORE info that can answer further questions.
For more information, visit: https://www.westcoastturf.com/
Comments Off on It’s Fall Overseeding Time (for your California and Arizona Turf)Apr
Tips For Mowing Your California and Arizona Sod
Maintaining a lush, green lawn in the arid climates of Southern California and Arizona can be quite a challenge. It’s totally achievable though, with the right approach. Mowing plays a pivotal role in keeping your lawn healthy and attractive. Here are some tips on the best way to keep your lawn beautiful when mowing:
1. Choose the Right Mower: It is crucial to select the appropriate mower to achieve optimal results. For Southern California and Arizona, where lawns often consist of warm-season grasses like bermudagrass, Zoysia grass, or St. Augustine grass, consider using a rotary mower. These mowers are well-suited for cutting thicker grass types commonly found in warmer climates.
2. Adjust Mowing Height: Maintaining the correct mowing height is vital for the health of your lawn. In hot and dry climates, it’s recommended to keep your grass slightly taller to provide shade to the soil and retain moisture. Adjust your mower’s cutting height to leave the grass blades around 2 to 3 inches tall. Taller grass also helps to inhibit weed growth by shading the soil.
3. Follow the One-Third Rule: Adhere to the one-third rule that states
you should never remove more than one-third of the grass blade’s height in a single mowing session. Cutting more than this can stress the grass and make it more susceptible to drought and diseases. Aim to mow your lawn regularly to maintain a consistent height.
4. Mow When the Grass is Dry: Mowing wet grass can lead to an uneven cut and cause clumping, which can smother the grass beneath. Additionally, wet grass is more prone to tearing, resulting in an unhealthy appearance. Therefore, it’s best to mow your lawn when the grass is dry, preferably in the morning or late afternoon when temperatures are cooler.
5. Sharpen Mower Blades Regularly: Sharp mower blades ensure clean cuts, promoting healthier grass growth. Dull blades tear the grass instead of cutting it cleanly, leaving ragged edges that are more susceptible to disease. Check your mower blades regularly and sharpen or replace them as needed to maintain optimal cutting performance.
Alternate Mowing Patterns: Changing your mowing pattern regularly helps prevent soil compaction and encourages upright grass growth. Consider mowing in different directions each time you mow to avoid creating ruts and uneven wear on your lawn.
6. Leave Grass Clippings on the Lawn: Grass clippings are a valuable source of nutrients for your lawn. Instead of bagging them, leave them on the lawn to decompose. This practice, known as grasscycling, returns essential nutrients like nitrogen back into the soil, promoting healthy grass growth. For more information, visit westcoastturf.com
Comments Off on Tips For Mowing Your California and Arizona SodDec
Synthetic Turf – Drought Fix or Health and Environmental Hazard?
California is no stranger to drought, it’s a recurring feature of our climate, especially in desert areas. Arizona has been in some stage of drought since 1994(!), so drought is a long-term concept in the West. Many shifts are made for the purpose of water conservation, one of which is in landscaping. With these dry times saw a large uptick in fake lawns.
In a recent controversial move, California Governor Gavin Newsom vetoed a bill aimed at restricting the use of “forever chemicals” in synthetic lawns. The veto highlights the state’s complex stance on artificial turf, as it was a material once promoted as a water-saving solution during droughts. The vetoed bill was part of a broader effort to address health concerns associated with synthetic turf, particularly the presence of perfluoroalkyl and polyfluoroalkyl substances (PFAS). These chemicals, found in the crumb rubber base of artificial turf, have been linked to various chronic diseases. Despite growing worries about the environmental impact and health risks, manufacturers claim they are working to address concerns by exploring alternative materials. However, removing PFAS entirely has proven challenging.
The debate over synthetic turf in California reflects a shift in legislative priorities, with some cities already moving to ban artificial lawns due to environmental concerns. Researchers emphasize the potential health risks associated with PFAS, which can enter the human body through various pathways, including skin contact, inhalation, and water contamination.
Studies indicate that high temperatures can cause chemicals to leach out of the crumb rubber base, posing additional risks to human health. Synthetic turf, known for its heat-retaining properties, can reach temperatures significantly higher than living grass, making it a cause for concern. Experts suggest that real grass and plants offer a more sustainable and environmentally friendly alternative to synthetic grass. Drought-friendly landscaping options, such as warm-season grasses and native plants, provide cooling benefits and contribute to a healthier urban ecosystem.
Comments Off on Synthetic Turf – Drought Fix or Health and Environmental Hazard?Jun
Dos and Don’ts of Home Sod Installation
When installing California and Arizona sod for your home, there are several dos and don’ts to keep in mind to ensure successful establishment and healthy growth. Here are some guidelines to follow:
Do:
- Prepare the soil: Ensure that the soil is properly prepared before laying the sod. Remove any existing grass, weeds, rocks, or debris and loosen the soil with a rake or tiller. Level the surface to avoid uneven areas.
- Test soil pH: Conduct a soil test to determine the pH level and nutrient content of the soil. Adjust the pH as necessary by adding lime or sulfur to create an optimal growing environment for the sod.
- Water the soil: Before installing the sod, water the soil thoroughly to provide adequate moisture for the roots. This helps the sod to establish and promotes good root contact with the soil.
- Lay the sod promptly: Install the sod as soon as possible after delivery or purchase. Sod is a perishable product, and delaying the installation can lead to drying out or root damage.
- Lay the sod properly: Start laying the sod along a straight edge, such as a sidewalk or driveway, and work your way across the lawn. Butt the edges of each piece tightly against each other without overlapping, ensuring no gaps or spaces are left between the pieces.
- Water immediately: Once a section of sod is laid, water it immediately. This helps settle the soil, removes air pockets, and promotes contact between the roots and soil.
- Water regularly: Keep the sod moist by watering it regularly for the first few weeks after installation. Aim for deep watering to encourage the roots to grow deeper into the soil. Avoid overwatering, which can lead to shallow root growth and other issues.
- Mow with care: Once the sod has established and grown to the recommended height, mow it to maintain its appearance. Set the mower at the appropriate height and avoid cutting more than one-third of the grass blade length at a time.
Don’t:
- Don’t delay installation: As mentioned earlier, avoid delaying the installation of the sod. The longer it remains rolled up, the greater the chances of it drying out and deteriorating.
- Don’t stretch the sod: Avoid stretching the sod while laying it. This can cause the roots to separate from the soil, making it difficult for them to establish properly.
- Don’t leave gaps or overlaps: Ensure that the sod pieces are laid tightly against each other without gaps or overlaps. Leaving gaps can result in weed growth and uneven appearance, while overlaps can lead to uneven rooting and hinder growth.
- Don’t overwater or underwater: Striking the right balance with watering is crucial. Overwatering can suffocate the roots, encourage disease, and lead to shallow root growth. On the other hand, underwatering can cause the sod to dry out and wither.
- Don’t walk on the sod too soon: Avoid walking on or putting heavy objects on the newly installed sod for the first few weeks. This gives the roots time to establish and prevents damage to the delicate young turf.
- Don’t mow too short: When it’s time to mow, avoid cutting the grass too short. Scalping the lawn stresses the grass and weakens its ability to thrive.
- Don’t neglect maintenance: Once the sod is established, continue with regular maintenance practices such as watering, fertilizing, and weed control. Neglecting these aspects can lead to the deterioration of your lawn.
Remember, each sod variety may have specific care instructions, so it’s always beneficial to consult with a local expert or refer to the sod supplier’s recommendations for best results.
Comments Off on Dos and Don’ts of Home Sod InstallationJul
Sod: Not Just for Your Lawn
We often talk about sod on a large scale, from athletic fields and golf courses to housing developments and private homes. But our sod has many more uses, as you’ll see.
Events
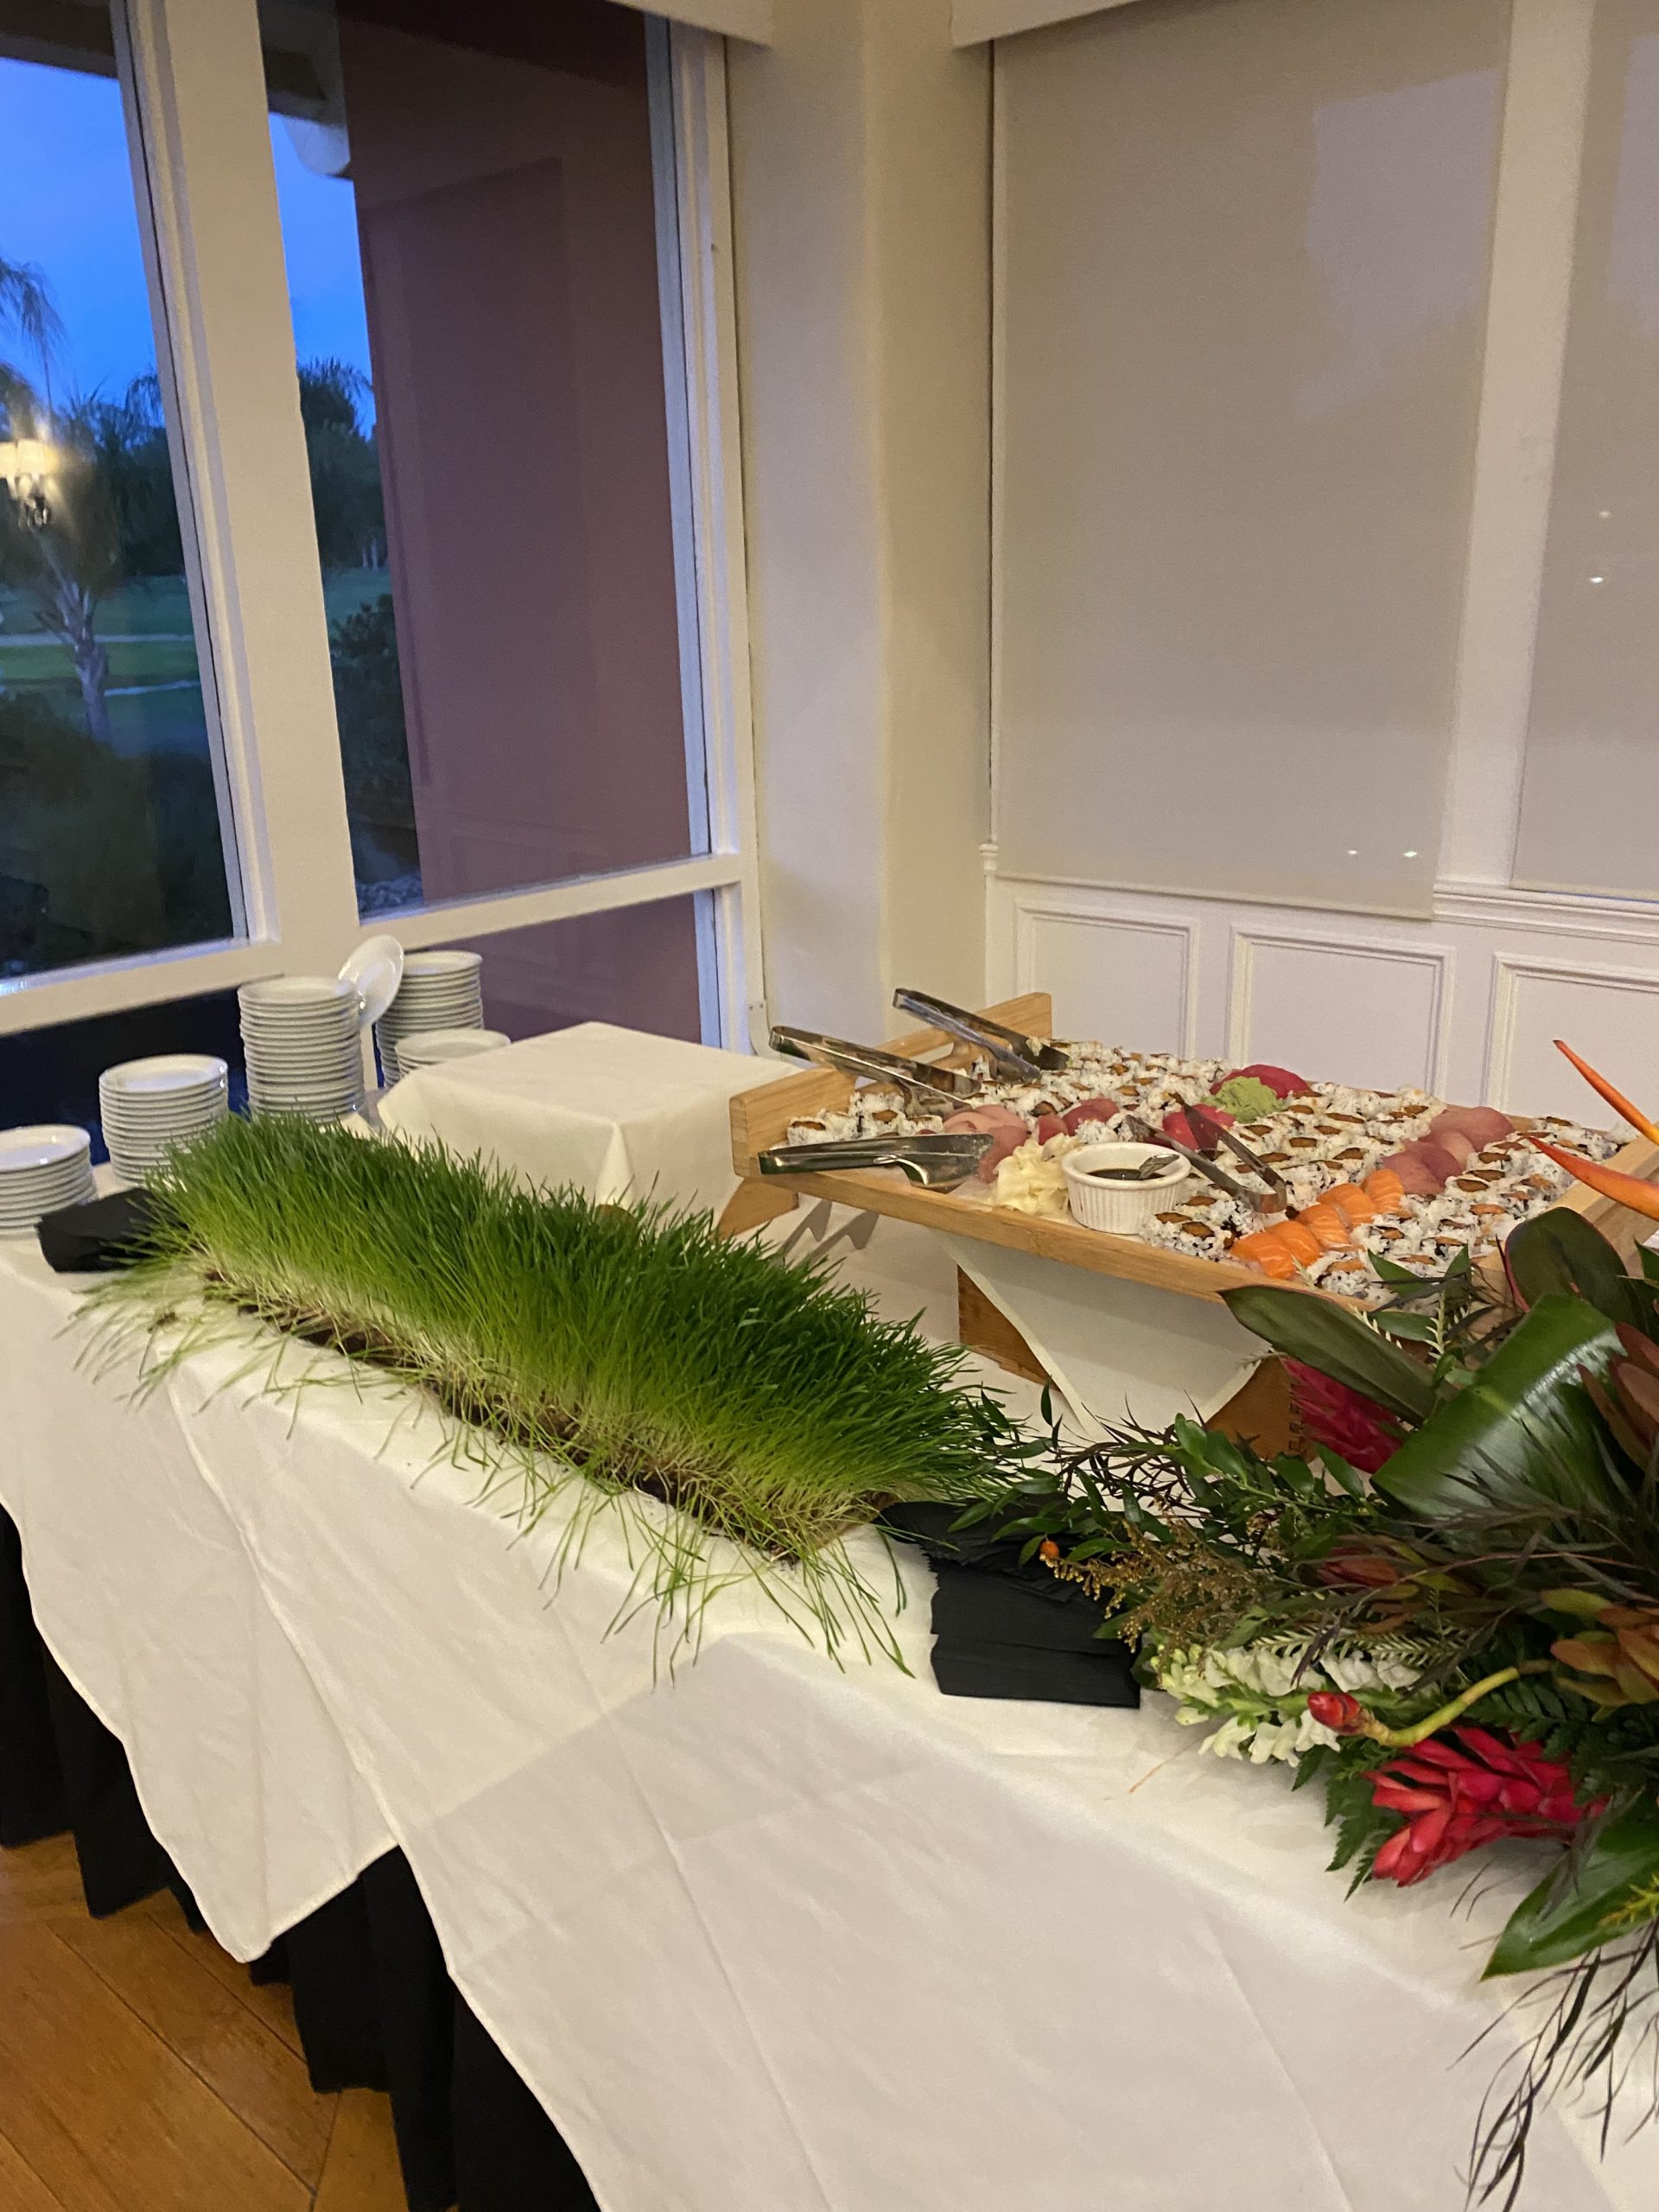 One place sod can be very useful is at events. You can lay down temporary sod for an outdoor area you’d like to soften up and give a more natural look. It looks great as decorative pieces, as well. We recently served a wedding where sod was used as a tabletop, as well as side accents.
Compost
One popular and helpful way to use sod is by creating a sod composting pile. When you take out sod to create a hard path or walkway, you will have extra and wonder how to dispose of it. The answer is not to dispose of it at all, put it to use! While the sod is still fresh, find a corner of your yard and lay down a piece of sod grass. Stack face down pieces of sod on top of that, wetting each piece before adding another. Once your composting sod pile is as high as you’d like it to be (not to exceed 6 ft), cover the it in thick black plastic. Weigh the edges down against the ground with stones or cinder blocks, making sure not to let any light to get in. Let your composting sod pile sit until the following spring and uncover it. Inside, you will find rich compost ready for use!
Gardening
Another great use for sod is creating the base for a garden or flower bed. Follow these steps to starting your new garden base! Pile the sod, grass down, in your new garden space until it reaches the desired height. Then cover it with 2–3 inches of topsoil. Finally, add 3–4 inches of mulch. This is a great way to use old sod to increase garden height for better drainage, or even build a tall, raised bed if desired. The sod slowly decomposes into rich soil which will eventually feed the plants in your garden.
Those are just a few small-scale uses of sod. Talk to us about your sod projects – large and small – and see what we can do for you! For more information, visit our website westcoastturf.com
Comments Off on Sod: Not Just for Your LawnNov
You’ve Overseeded Your Warm Season Lawn. Now What?
By now, most of you who are going to overseed your California or Arizona sod have either begun the process or have had your seed down for a few weeks. Today, I want to discuss what to do now that you have the ryegrass growing and cooler temperatures are on the horizon.
Getting your ryegrass up and growing is obviously the first step to a successful winter lawn, but what about maintenance? How can you make sure your ryegrass is strong going into the winter and you will have a full stand of ryegrass once the temperatures begin to drop into the 40’s at night? There are several key items associated with a strong winter lawn but early preparation should be high on your list.
I know you put down a starter fertilizer with your seed but let’s remember that fertilizer will move freely in a saturated soil. The new plant took up most of the nutrients from the starter fertilizer application but the residual affect is limited because you’ve been keeping the seed wet for the past few weeks. So what exactly does this mean? Basically, what I’m trying to say is that once you’ve had your ryegrass lawn in for 2-3 weeks I would advise getting a second fertilizer application on the grass.
Sep
Questions About Fall Overseeding? Check Out This Video Guide From Mr. Wise Grass!
Yes. It is about that time! If you have warm season grass, you are most likely considering overseeding your lawn. Check out this educational video including Q & A from Jay Danek–Mr. Wise Grass himself. After this video you will know exactly what you need to have the best winter lawn in the neighborhood!
Nov
You Have Overseeded Your California or Arizona Sod Lawn–Now What? And….Even if You Haven’t.
By now, most of you who are going to overseed your California or Arizona sod have either begun the process or have had your seed down for a few weeks. Today, I want to discuss what to do now that you have the ryegrass growing and cooler temperatures are on the horizon.
Getting your ryegrass up and growing is obviously the first step to a successful winter lawn, but what about maintenance? How can you make sure your ryegrass is strong going into the winter and you will have a full stand of ryegrass once the temperatures begin to drop into the 40’s at night? There are several key items associated with a strong winter lawn but early preparation should be high on your list.
I know you put down a starter fertilizer with your seed but let’s remember that fertilizer will move freely in a saturated soil. The new plant took up most of the nutrients from the starter fertilizer application but the residual affect is limited because you’ve been keeping the seed wet for the past few weeks. So what exactly does this mean? Basically, what I’m trying to say is that once you’ve had your ryegrass lawn in for 2-3 weeks I would advise getting a second fertilizer application on the grass.

Oct
Frequently Asked Questions About Overseeding Your Warm Season Lawn
Now that we’re into October it’s time to get the overseeding of your warm season grass process started. I wanted to pass along some of the most frequently asked questions during this time of the year.
When is the best time to start overseeding?
Ideally overseeding should be done when nighttime temperatures are consistently in the 60’s. Usually this will be in October. There will be some higher and lower than normal temperatures, but anytime during October is good.
How low do I need to scalp the grass prior to seeding?
Height of cut isn’t as important as opening the turf canopy. The shorter you mow the grass, the tighter the turf canopy will be which will result in the need to verticut more aggressively. I recommend not going lower than ½”. There is no need to take the lawn to the dirt or you will cause long term problems to the grass plant.
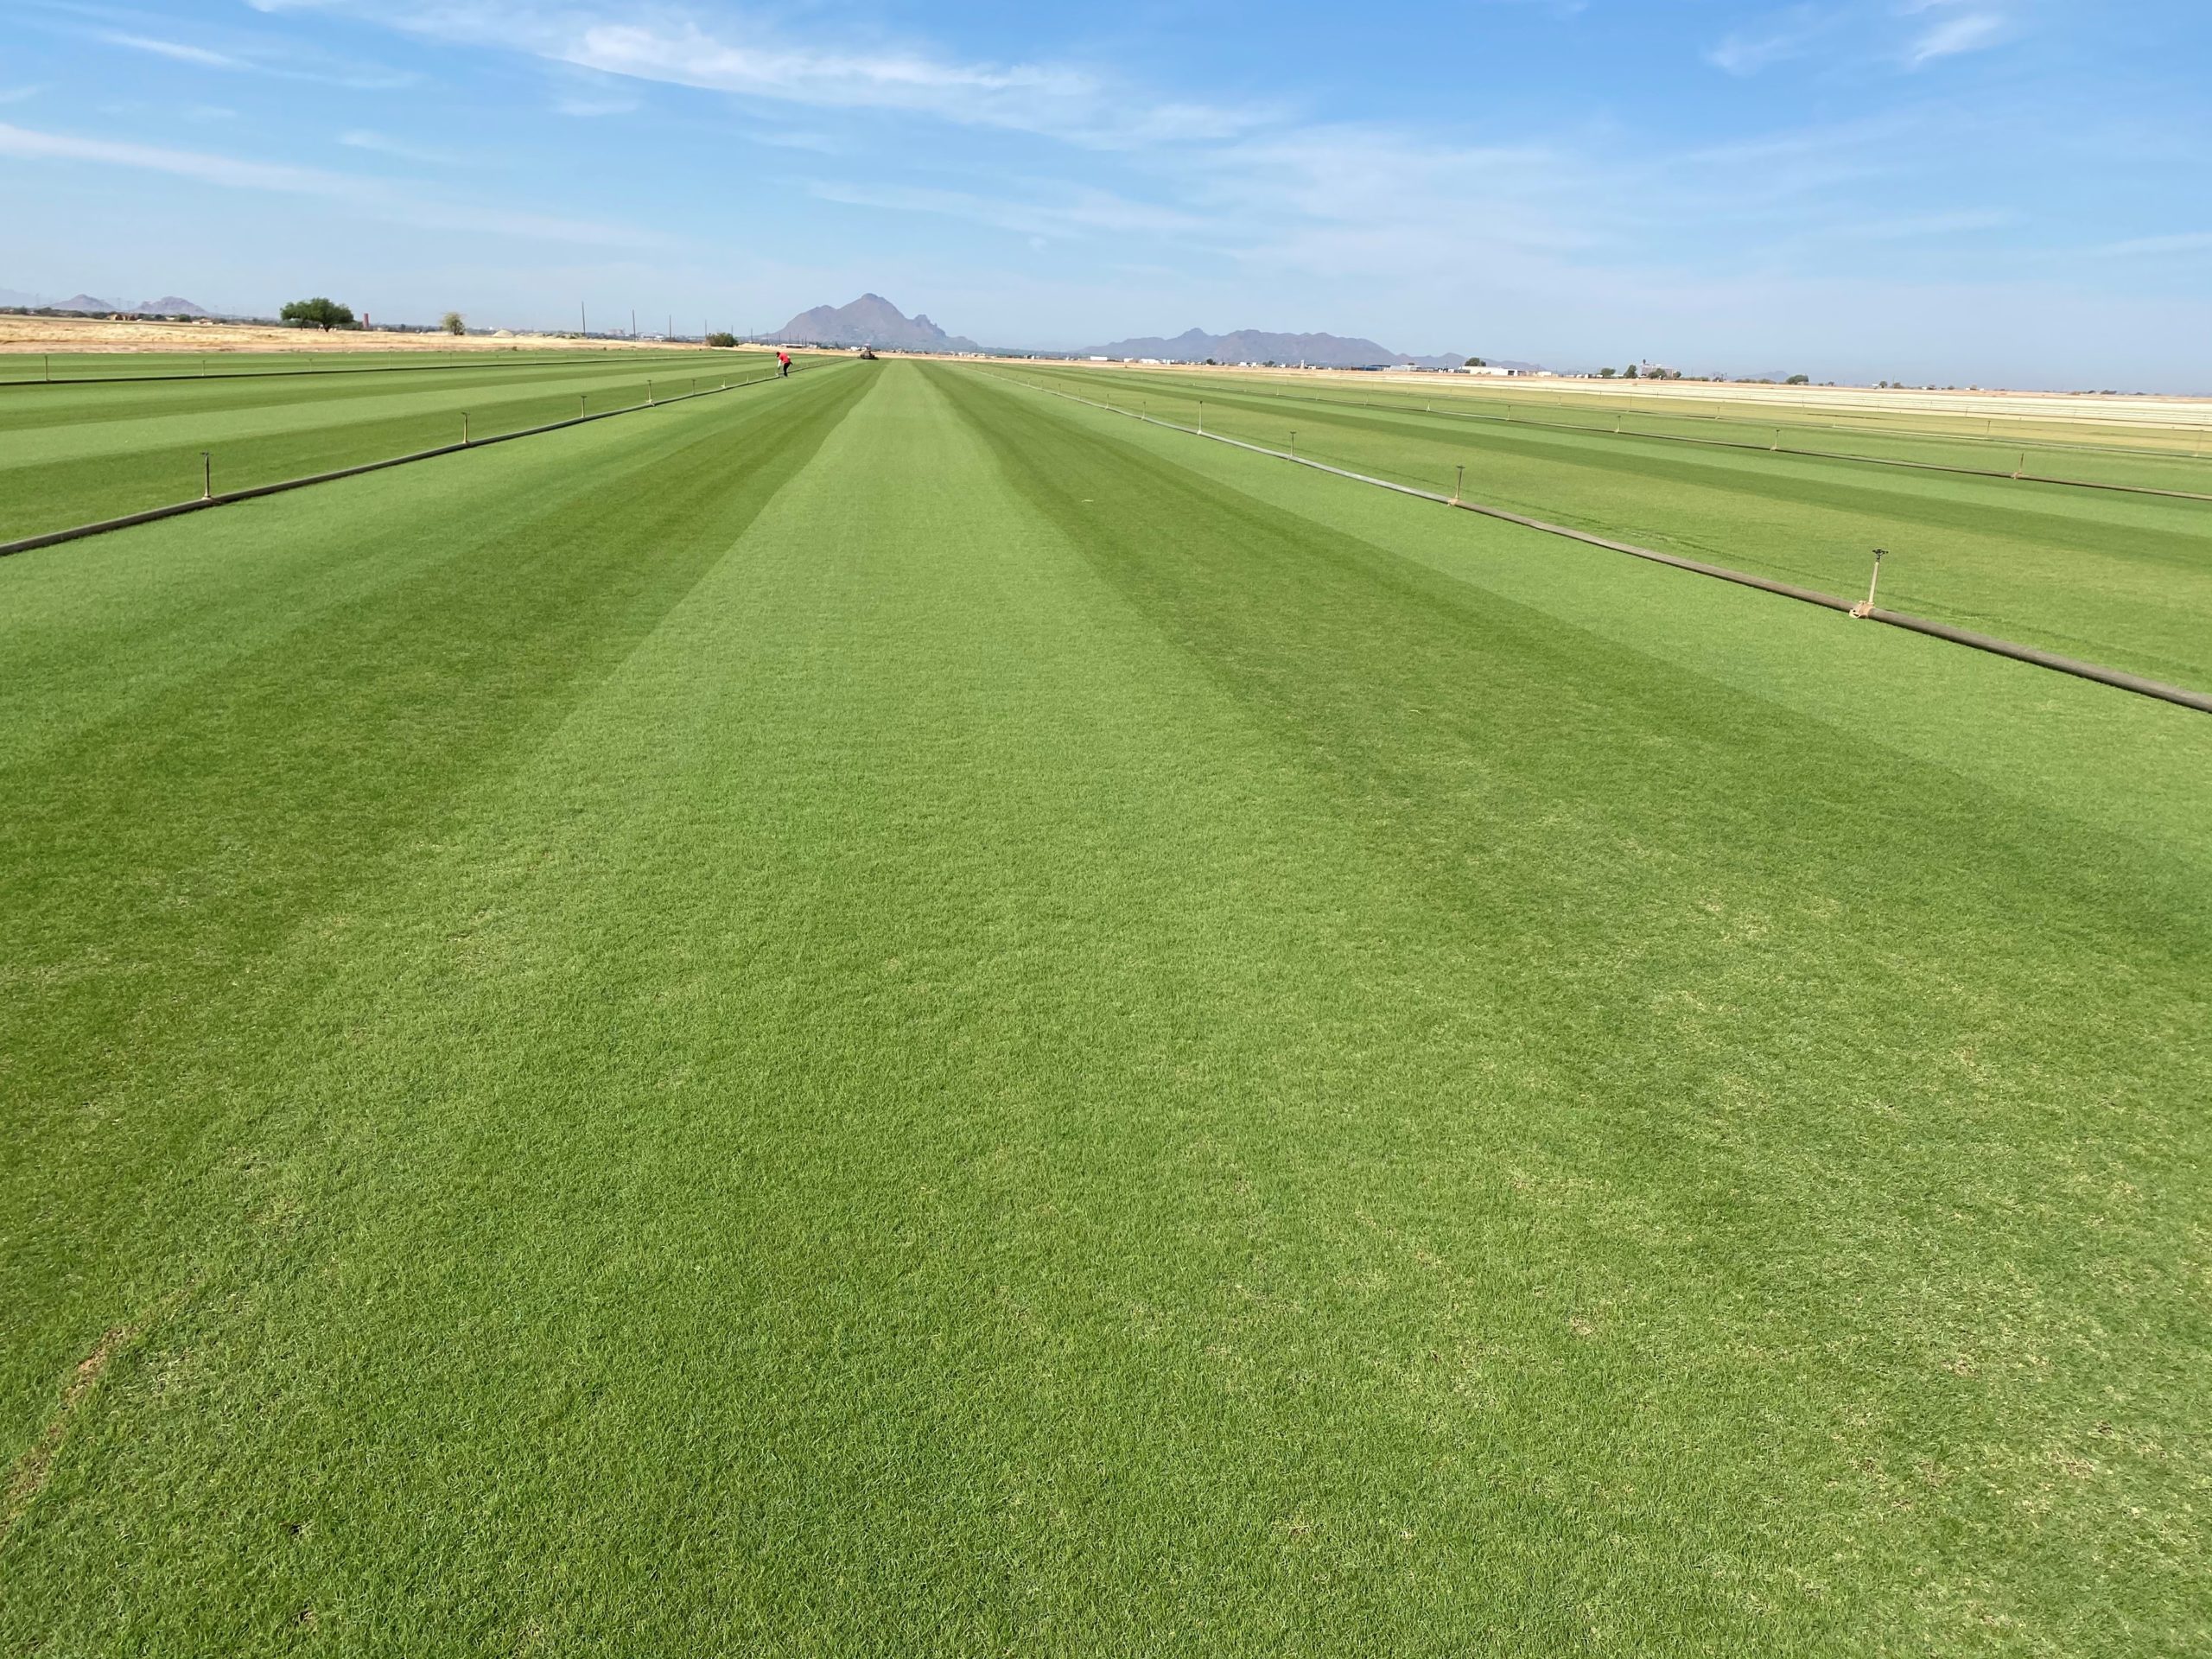
This overseeded bermuda sod field in Scottsdale, Arizona, is READY!